Making a better mouse

I’m going to be at a craft fair on 5th September 2013 (, which is also a book launch for the next installment of Tales from Beauty Bank.  They are stories about a wonderful family of mice and their exciting adventures in and around the English county of Cheshire.

Well, when I heard that there was to be a new book, I so wanted to make a jewellery version of one of the little mice.  I contacted the author, Michael R. Beddard for his permission, and after checking with the artist, Rebecca Yoxall, I got the go ahead and this is what happened.

I was sent an image of Carlos, a mouse not yet seen in the books, for reference.  He looked so sweet and I decided that he’d make a wonderful brooch.  There had been clues about gems being of some importance in the new story, so I decided to make him holding a sparkling gem in his little paws.

I decided to draw his outline on paper and looked to see if there would be any weaknesses in the design.  To help strengthen the finished piece, I gave him a curl to his tail and took it up and over his body.  To give an extra dimension to the mouse, his tail would be added on in round wire, but to give strength, I would also cut out it’s shape in the silver sheet.

Image

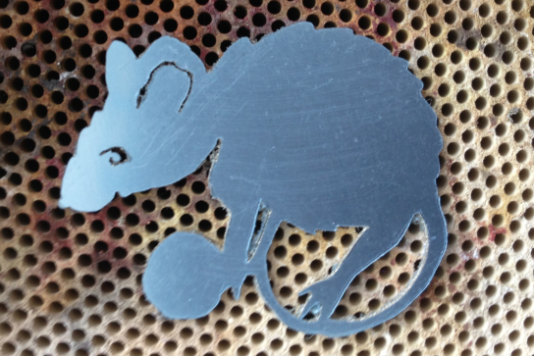
Above, you can see the silver sheet pierced (using a Knew Concepts hand saw, which is an amazing piece of kit) and with it’s protective film still on.  I’ve left the area for the gem quite large for the moment, just in case I change my mind about the gem or the exact placement.Image
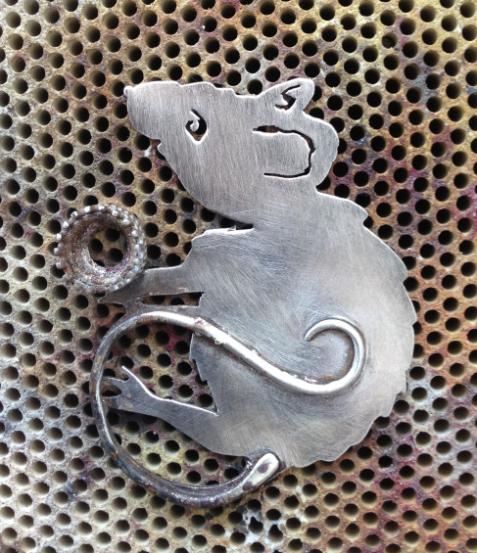
This is Carlos with his tail and bezel soldered on.  He’s had a first filing to smooth any rough edges and to check all the surfaces are joined well. He’ll go in the pickle after I solder the brooch pin on the back.  His tail was slightly flattened at one end and the tip was filed to taper down to a blunt point.  As I was using round wire (1mm diameter), I filed the base down slightly to give a flat edge which would connect well with the main body and give a good connection when soldered.

Just a note on the brooch pin itself.  If it gets heated then it will loose it’s hardness and become annealed (soft for working with).  Also, air-cooling rather than quenching in water will help too.  I work-harden it back to usability by hitting it with my rawhide hammer until it becomes strong enough not to bend easily.

The bezel is made from fancy bezel wire (it just means shaped and not plain strip) which has been soldered into a circle (5mm inside diameter) and a jump ring has been slightly flattened and soldered inside as the bezel shelf.  I checked the gem in the mount, and as the gem was faceted, I filed the seat of the bezel to fit.

On the main body of the piece, I worked out where exactly the bezel would sit, and took out a circle of about 3mm across for both reasons of weight and ease of keeping the stone clean.  The bezel was then sweat-soldered (solder was melted onto one surface only and then gently re-melted with the bezel sitting on top) to the piece.

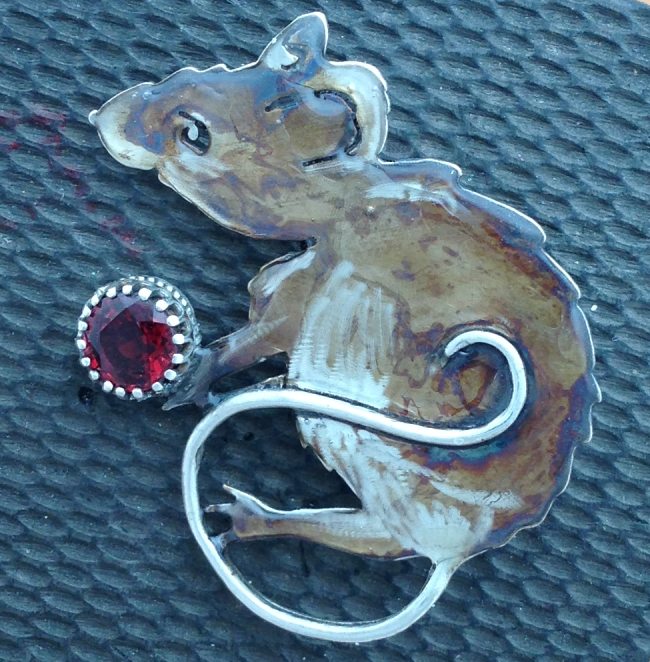
After pickling, filing and polishing, It was time to give this little boy some colour.  I decided to use Liver of Sulphur with a brush and try to re-create the feel of the original watercolour.  I layered on the liquid LoS and then washed it off in cold water (it stops the chemical reaction, but unfortunately not the rotten egg smell).  I did this quite a few times, as the colours changed from gold to brown to blue and then purple.  I used a fine silicon polishing stick in my Dremel to rub away the patina to give lovely highlights and show off his lovely white tummy.  And here he is …Image
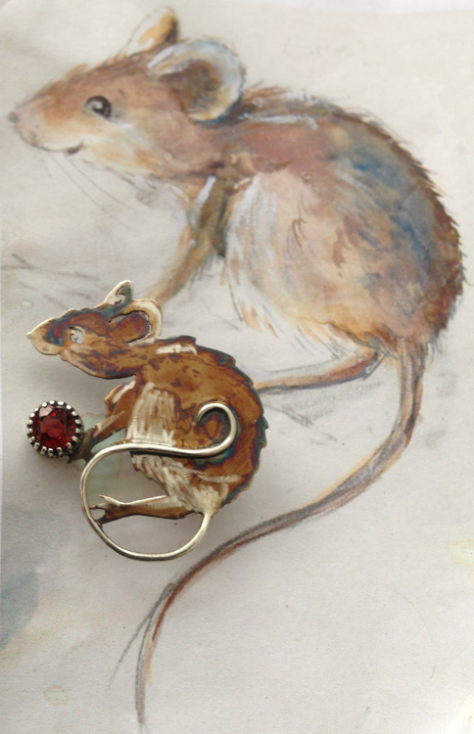
The gem is real garnet and I think he looks splendid with it!

Well, I thought I was finished but I sat thinking about how to protect the finish. Normally, I would use Renaissance Wax but I was really worried about the patina scratching, even through the wax,  This time I decided to seal the colour with a glossy doming resin that is cured by UV rays.  I use a toothpick to drop the resin onto the piece, starting round the edges and curing that before going on to fill in the center (this is because the resin has a tendency to pull in, leaving the edges exposed).

Here is little Carlos with his new protective coat:

Image

UPDATE:

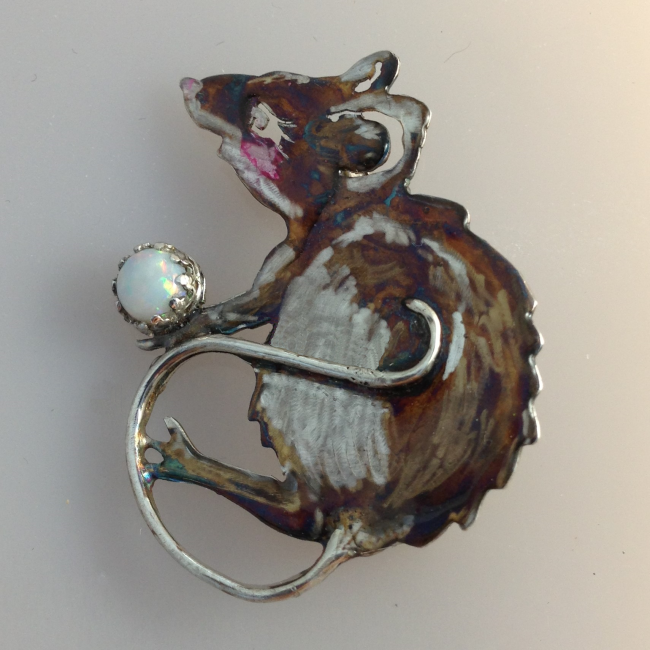
The author liked my version of Carlos so much, he commissioned me to make a similar one for his mum.  She loves opals and so I sourced a special translucent opal (solid, not a doublet or triplet) with beautiful flashes of colour.  I decided that this mouse would be Rachel, who is in the books!

The differences are the eyelashes and her more finely shaped head. She has a pink nose and pink cheeks, which were done using watercolour & gouache paint after the LoS patina was applied.  The first photo below is before the resin top coat and the second one, after the top coat was applied.ImageT
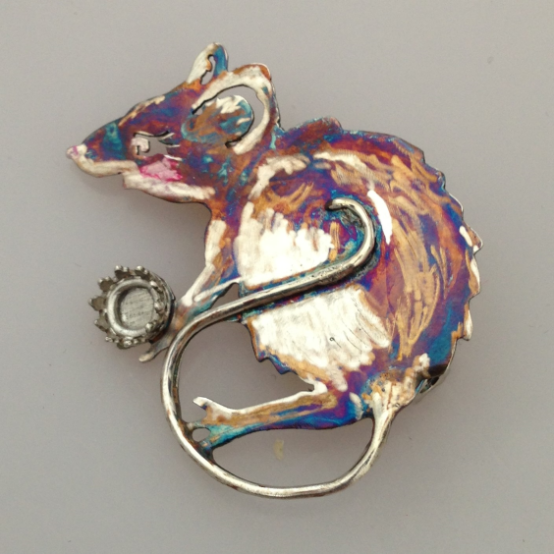
I can’t wait to see how these two little mice are received at their own little coming out party to celebrate the book launch.  I hope Michael’s mum and whoever has Carlos, will love them as much as I do.Image
A Day at the Fair

Last weekend I did my first big event. A Mind, Body, Spirit & Gift Fair in the Memorial Hall, Northwich.

Firstly, can I say that you never have too much stuff. I had less than two weeks to prepare for this event and it gave me a real kick to make some new designs (almost a proper “collection”!) and finish others which had been laying about on my bench for what seems like forever.

When I had finally got them all together in one place, I really thought I had made too much; but I can tell you that it’s really impossible to make too much jewellery for a show/event.

When you get your table together on the day, you’ll find that there is a space where something special needs to go, or you’ll want to make a statement display (maybe one colour or type of jewellery) in one area. If you don’t have enough stuff then it makes this sort of thing very hard to do. It also is a good idea to swap pieces over or to a different place place, at least once in the day. People go around these events in a circle, and more than once. Some even go away and come back, later in the day.  Changing your pieces over makes it look fresh and may just give the right piece a time to shine and attract more customers. One piece of mine just sparkled so much that it enticed people over from the other side of the venue!

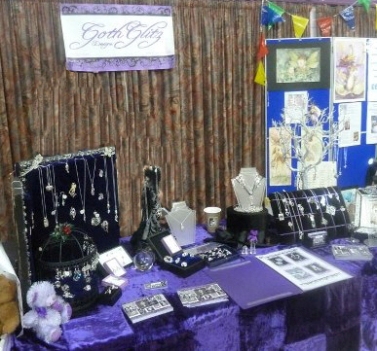
I had made a sketch of what I wanted my table to look like. I wanted my display to look unique but also in keeping with my designs. I didn’t want many mass-produced display items on there (they don’t seem to show off the jewellery very well), so I had to think of display items that I could make or customise. I will do a separate post about this later on! My assistant (husband, Chris) and I got to the venue about 8am to set up. I had been up till 2am the night before, doing the final pricing and sorting out, and up at 6am so I could wash my hair and look my best for the day (I am so grateful for make-up!). We didn’t have a large enough tablecloth but made the best of it, with my beautiful purple velvet throw over the top. Having the sketch made it easy to set up.

One thing I had done, was to put photographs together in a book of all my main pieces.  This meant that as well as having something for people to look through, I could show people pieces that I had already sold.  It helped to say, “look, you could have something like this” and have a picture for them to see.

Image

Oh, I had added jewellery to my larger display pieces the night before and wrapped in cloth (to protect the delicate items), which made things even easier. I like things to be grouped in a way that makes sense and it took a while the night before to decide on where each of my best/most expensive items would be. If I had to have done that on the day, it would have been a nightmare!

I made sure that there were different levels on my table and also a mirror (very important!). I have got a little device that people can put an earring on and then put up to their ear (so they can see how an earring looks), which is very hygienic  and it means that I actively encourage people to touch the jewellery. I think it’s most important to let people connect with the jewellery by touching and trying on.

It’s always a good idea to go round the front of your table and see it from the customer’s side. What I do too, is to go further away (when setting up), even the other side of the venue if it’s not too big, and see how my table looks from there. This time one of my pieces just sparkled and stood out, even from a long way away. It showed my lighting was okay (I used battery-operated, clip-on LED lights, but I still think I need better next time) and I was pleased that my table stood out.

All the detritus was stored away under the table and all the boxes (with new shiny labels on). I had pre-prepared some bags with tissue paper and labels, and these too were under the table. When I got a sale, I didn’t want to be fussing about with boxes and packaging; I wanted it all ready and to hand. I don’t like taking my eyes off my
table for too long – some things can walk off the table if you’re unlucky (not a problem at this event), or I might miss that important cue from someone who wants to buy or ask a question. Its the same reason why I don’t really sit down at events (I’ve done them for other people before this one) – I find it easier to talk to people and it keeps me on my toes (not literally!)

I was very lucky that my mum came and stood at the table now and again (in between going around the event herself as a customer). It gave me a chance to nip off to the loo or go get a drink. I don’t like asking the people either side of me, it’s unprofessional and they have their own tables to look after. Having mum (and now both my in-laws and mum’s friend) there also helped because I think that people saw a busy table and came over to see what was interesting all these other people. They didn’t stay long but it was a nice boost to the day.

I like talking to those who come see my table. Not too much, as it can either put some people off, or mean that you end up in a long conversation rather than selling. I like to ask people what their favourite piece (of their own jewellery) is. It is a bit of an ice-breaker, but it also gives me an insight into what they might be looking for. I made lots of new contacts – wonderful, even if they didn’t buy something. Someone who likes your stuff may not buy then and there but may either buy later, or tell friends/family about your stuff, or even both. Word of mouth is my best advertising, and I thank everyone who came to say hello at the event.

A good rule is to not forget to thank the organiser. Sarah Buckley, thank you! Sarah made me feel welcome and part of things. She provided all the information and helped in any way she could. I can’t thank her enough.

As well as making some profit on the day (hooray!), I had four new commissions to make. I couldn’t wish for a better outcome to the day.

Here’s to the next one!

Aside

Do you know how a top jewellery designer spends their day?

Well, I don’t know either, but here’s what I get up to on my typical jewellery making day (this being a Friday) …

7:30am – woken up by Siamese meowing

7:35 – turn over and try to go back to sleep

7:40 – get up and feed cats

7:50 – back to bed to catch half an hour extra sleep

8:00 – woken up by 4 year old daughter

8:10 – finally up and dressed

8:15 – feed cats

8:20 – check emails and eat breakfast

8:50 – take daughter to Nursery

9:15 – feed cats (where do they put it all?). then to my workbench with a cup of tea or coffee.

I look at my bench – did I really leave all that stuff everywhere?  I’m sure it must be the jewellery fairy, who in my house hides my tools, tarnishes the silver and knots up the silver chain when I’m not looking. After making a clean space in which to work, I then look through my box of ‘work in progress’.

My ‘work in progress’ box has all the bits that I am in the process of making, taking apart, or working out what to do with. Some things have been lurking in there for a long time, but one day I might suddenly have a ‘eureka!’ moment and there will be the exact thing I need in the bottom of this box of potential treasures.

I also have a selection of books which I do all my design sketches in.  If I haven’t got a commission or something ready to work on, I will flick through my books and then either make new sketches or pick something to adapt and make.

I have drawers to the right of my bench with all my metals (sterling wire in the top drawer, sterling sheet and tube in the next one down and gold in the bottom one), and another set of drawers next to that with my materials for soldering and polishing.

To my left are my shelves of findings (head pins, ear wires etc), gem settings, crystals and gemstones – all in clear boxes because I like to be able to find things easily (and the sparkly colours look beautiful).

My actual workbench (see earlier post) I found to be a little too low and I was in danger of getting a bad back, so I made a wooden plinth to raise it up (which now also means I’ve got somewhere to rest my feet on, which is a real plus in my book).  The only problem now is that for some things, I actually find it easier to stand up to work.  I’ll get used to the height difference soon, I hope.

My run of benches/storage makes up the divider between my half of the room and my daughter’s playroom, so I don’t have a wall in front of me to hang my hammers and saws up on.  It would be useful too to have a pin-board, but I’ll have to work with what I’ve got at the moment. So, all my tools are on my workbench, but I’ve made a note of where my hands think something should be when I reach for a tool whilst looking down (not as hard as it sounds) and have moved everything round accordingly.

Well, I’m here at my bench, design in mind and tools in hand … so this is the perfect time for a cold-calling salesman to make my telephone ring, or at very least, it’s a wrong number.  Oh well, time to feed the cats again (before you worry … they only get a small amount each time.  I’ve got three skinny cats, honest!).

Back to the bench, removing a sleeping cat from my seat (how did that happen? wasn’t it eating a minute ago?) and then I pick up my favourite things – a piece of sterling silver and my piercing saw. The day stretches in front of me and I feel all creative.  Suddenly, time snaps back and it’s 5pm (did someone play with the clocks again?).  Hopefully, I’ve got something (or many some-things) made and soldered, ready for the tumbler.

5:15pm – feed cats

5:30pm – go pick up daughter from Nursery

6pm -It being a Friday, I get my other half to cook whilst I polish and put the finishing touches to the jewellery.  After my little one’s bed-time, it’s time to take photos and then sit down at the laptop to price up and type up the fruits of the day’s labours.  Okay, okay … a bit of Facebook surfing & chatting too 🙂

1am – go to bed (but not till after feeding the cats!)

A Brief Pause and a Time to Reflect Before Beginning Again

I’ve just realised how long it’s been since my last post.  In the big scheme of the Universe (or Facebook, if you know what I mean) it’s only been the blink of an eye but to me the time has been an eternity.

My Frodo, my beautiful boy and friend in fur, passed away from complications due to his kidney disease in early November 2011 and I’ve not had the heart to post anything since.

I’ve still been making jewellery, both successful and not so successful, and I’m still learning with each experience.  There are new stories to tell and things I can’t wait to share, but first, I want to acknowledge this pause and take a deep breath to steady myself before diving back into the waters of blogdom.

So, here’s to my Cheshire Cat, Frodo, who inspired me, watched me work, and could always find a clear spot on my workbench to watch the birds from.  He will be missed forever.

“One-a-Day” Recycling Challenge – Day 30: The Final Piece

Today is the last day of my “one-a-day” challenge.  I can’t actually believe it’s been 31 jewellery making days since I started this – time really has gone quickly and I’m feeling sad that I’m at the end.

Well, you’d think that I’d choose something nice and easy for my last day, something I couldn’t muck up and turn into another disaster!  Sorry, but you couldn’t be more wrong if you tried!

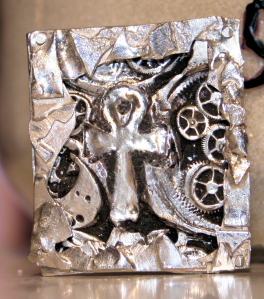
Today, I wanted to do a piece that was special to me and I have a beautiful silver ankh earring (again, I had lost one of the pair) which needed to be made into something really beautiful.  For those of you that know Neil Gaiman’s The Sandman, The Endless each have a gallery of symbols that they use to call each other – and Death’s symbol is an ankh.

The design is of a ankh in a frame, as if it is from one of the galleries of The Endless.  The background is of cogs and watch pieces and the frame is to be made out of lots of small pieces (like an old ironwork frame that has rusted into twisted shapes) as I also identify the character of Death with the concepts of time (as in time running out, and the end of time, etc.) and entropy.

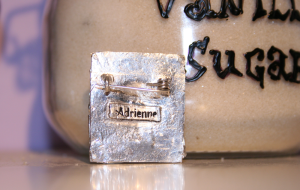
The main part of the brooch was made in PMC3 – the cogs and watch pieces were made using a unique stamp I had made previously, and I added thin strips of PMC3 to the edges to make them level.  I cut off the loop at the top of the silver ankh earring (to make it look better) and, as it seemed to be silver all the way through, embedded it into the middle of the brooch.  After drying in the little electric oven, I added the brooch findings to the back (made by hand – I will do a proper tutorial on this soon) and my name stamp.  Another 20 minutes in the electric oven and it was time to torch-fire the brooch.

When I torch-fire things that are larger than normal, I place small pieces of fire-brick around the piece (almost like a mini-kiln) and it keeps the heat around the piece better than if I just fired it on a flat board.  It worked really well and the piece fired perfectly – or so I thought.  When I turned the brooch over (I had fired it face-down because of the brooch findings on the back) the ankh had deformed and turned a really funny grey, not like the normal fire-scale I was expecting.

I filed the face lightly and the ankh shone silver underneath the patina, so I thought it was just a reaction with the PMC3 but, oh no, it turns out that the earrings were base-metal with a foil of silver folded around it.  I found that out because the foil just lifted off the base-metal when I investigated further.  I had a moment of panic as I tried to remove it from the brooch but, I am so glad that the ankh came away pretty cleanly after prising the central base-metal away and then grinding off the foil with the rotary tool.  I was left with an ankh-shaped indent rather than the raised shape I had originally wanted. Oh well, I would have to wait and see how it all ended up before I passed judgement – sometimes, something wonderful comes out of disaster (but also, sometimes it just ends up in the scrap bin!).

The frame was made from lots of tiny scrap pieces of 0.4mm sterling sheet.  I drew the outline of my brooch onto the firing board as a guideline and then placed my fluxed pieces down and soldered them all together with easy solder.  (Sounds simple, but getting them all to stay where I wanted and then for everything to solder at the same time was really tricky.)  Both pieces were placed in the pickle pot and then washed before going into the tumbler.

A piece of 0.8mm wire was made into a coil with two straight ends, the longer one to be the brooch pin and the shorter one to be part of the spring.  This too was thrown into the tumbler, to work harden and polish.

After tumbling, the face of the brooch was given a patina and sealed with Renaissance Wax.  Then the frame had a hole drilled into each corner and four corresponding holes were drilled into the brooch.  The frame was attached to the brooch with “rivets” ((this was the first time I’ve ever done rivets in jewellery) which were short pieces of 1mm sterling wire threaded through both pieces and the ends hammered so that they splayed slightly, holding the pieces in place.

The brooch pin was added and the piece was finished.  Okay, it didn’t look quite how I had imagined; but as a final piece it was apt.  I had used leftover pieces and tried some new things. I had learned some lessons the hard way and had to get myself out of a fix with some unorthodox Macgyver-ing.  I’m sorry that it wasn’t the amazing piece of jewellery I had wished to make – but I learned a lot making it and that’s something I can be proud of.

Today is not the end to the making or the posting, or even the making from left-overs!  Just the challenge of making something every single day.  Please remember that my normal working hours are only on a Friday (when my little one is a Nursery) and any other time that I can snatch from my full-on schedule as a full-time mum (and cat-nurse).  This really has been a challenge but one that I would encourage anyone to try.  Thank you for being on the journey with me.

“One-a-Day” Recycling Challenge – Day 30: Leaves of Gold

I sang of leaves, of leaves of gold, and leaves of gold there grew…”  so starts Galadriel’s Song of Eldamar by J.R.R. Tolkien.

I know the leaves in my earrings are actually based on those of the rose and not from trees, as in the song; but to me they do look like they belong in Tolkien’s world.  I can imagine them being worn by an Elven maiden, or a hobbit wife or daughter.  They are so light and delicate, beautiful in their simplicity and evocative of nature (so maybe good for a garden fairy too?).

My whole household are Tolkien fans (my hall even has the door to Moria painted in silver on the under-stairs doors and the White Tree of Gondor half-way up the stairs on the half-landing wall) and I have a feeling that these earrings are only the beginning of the Tolkien/LOTR films inspired jewellery.

The recycling part of these earrings is mostly in the form of the pure silver PMC which the leaves themselves were made from.  When PMC dries out, it can still be re-used but the dried ‘clay’ needs to be ground up really fine (I use an electric coffee grinder) and then all impurities sifted out (I use a fine mesh bag which originally I bought to put jewellery in when sold, but it works really well for this too).  The powder is then mixed with a few drops of water till it reforms into a ‘clay’ ball and then I roll it out, between sheets of greaseproof paper, again and again until it becomes more like the ‘clay’ that comes out of the original packet.

Well, I find that this recycled PMC3 ‘clay’ is really good for using with my moulds and today I used one, originally for cake decorating, to make my little leaves.

The gold on the leaves is pure 24k gold that has been purchased as a powder and then made into a thin paste with glycerine and water.  I used a silicone ‘brush’ tool to paste a layer onto the freshly fired pure silver and then after it dried, I torch-fired the pieces to bond the gold into the silver.  It’s not like plating as the gold is actually bonded into the silver rather than just coating it.

I had wanted the gold to give the impression of texture on the leaves, like those turning gold in Autumn, so the layer of gold paste was applied in patches rather than all over.  The veins of the leaves were also left silver, which gave some definition.  The gold has been only applied to the front of the leaves, as in nature rarely are both sides of a leaf the same shade/colour, and it also seemed overkill to cover the whole leaf in gold.

The beads are gold-filled (also known as rolled-gold, a thicker layer of gold than ordinary gold-plating and also more durable) with a ridged texture and the golden crystals are Fire-polished Czech crystal rhondelles the colour of light golden honey.

The ear-wires and wires that hold the beads, are all sterling silver, but I suppose they could be rolled-gold if need be (the only thing is that rolled-gold or gold-filled wire has a metal core which shows when it is cut and so looks odd when used for ear-wires or anywhere where you can see the cut end).

Elven leaf earringsBy the by, the picture was taken in my kitchen – which is all Alice in Wonderland themed.  That’s a hand-painted picture of the Cheshire cat which is just above one of my shelves, just about where his head would be if he was sitting there.  I’ve got lots more hand-painted images on the walls,  I’ll have to do an Alice inspired piece of jewellery so I can post more pictures of my pretty kitchen!


“One-a-Day” Recycling Challenge – Day 29: CZ’s Are This Girl’s Best Friend

Wow, still a day behind in my posts, but not in actually getting the jewellery made.  My headache finally disappeared but the time has flown today with all the extra care that my Frodo has needed, as well as all the ‘normal’ day-to-day mum-things I get to do.  Although, saying that – am I the only one who plays modelling dough with her daughter and ends up designing jewellery with it?

For a good many years now I have had this one lonely earring, mooching about in my personal jewellery stash, lost without it’s twin.  I really loved it (although when I wore the pair they made my ears itch) and have wanted to do something with it for a long time.  With the help of some Siligum silicon moulding paste, PMC3 pure silver and three CZ’s – I think today’s the day I make it finally useful.

Siligum moulding paste is great stuff.  It comes in two parts, white and blue.  Equal amounts of both colours are kneaded together until all the white disappears and it is uniformly blue.  Then you have a few minutes to press your items into the paste and wait for it to cure into a flexible mould.

I made a ball of the mixed moulding paste and slightly flattened it with a flat piece of perspex.  Then the earring was pushed into the paste and left while the mould cured (when it’s ready, it will resist you pushing your fingernail into it and will bounce back).  As I’m not very good at judging exactly how much paste I’m going to need (no pun intended), I always make a little more than I expect to use and have some extra things handy to make moulds of.

The mould was then filled with PMC3 and left for the PMC3 to dry enough that it could be removed from the mould without cracking or breaking.  A hole was cut in the centre so that the pear-shaped CZ would have light going all the way through.  The CZ was put in place and a ‘snake’ of PMC3 was coiled around it, with slip pasted over any joins or gaps to seal the pieces together.  20 minutes in the small electric oven and it was ready to sand smooth.  Any details were added or defined with a metal scribe, and then the piece was torch-fired for a couple of minutes to burn off the binder and sinter the piece back into pure silver (a process based on atomic diffusion that creates objects from powders. Sounds more like alchemy than jewellery! ).

After sintering, the pin was soldered to the back with medium solder and then a round claw setting was soldered in place at the top with easy solder.  (I have a soldering mat with holes in which is really useful when a piece has an earring stud pin or a tie-tack pin and I need to solder something to the front as well.  The post/pin goes into one of the holes and keeps the piece flat without having to be held with tweezers which can cause problems as heat sinks.)  A quick dip in the pickle, then a steel brush and silicon wheels were used to bring the silver to a shine – with an agate burnisher being used for the final mirror-shine polish.

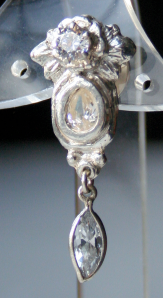
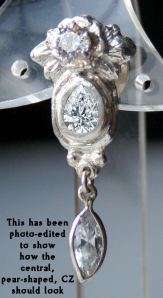
The round CZ was added to the claw setting and another cz, this time a marquise cut, was added as a dangle.  Just to say that I re-used the mount for the marquise-cut CZ – I had to cut it to size and solder the ends shut then re-mould it round the stone so that it held it tightly in place (the original stone that it held was much larger and pear-shaped).

Just to say that of the following photos, only the first is the real deal.  It’s quite obvious, but I just wanted to be clear – the second image has been photo-edited to show how the middle gem should look.  It looks beautiful in real-life, but I don’t think I took the right angle photo and it looks like all it’s sparkle is gone.


“One-a-Day” Recycling Challenge – Day 28: Love Hearts

Once again I am apologising for not getting this post written and uploaded the same day I made the jewellery.  I have a good excuse though (honest!) – one giant, monster of a headache which arrived on Sunday afternoon. .  This made working with the computer just impossible, and it’s still pretty painful to look at the screen tonight (yes, it’s still here; and boy, do my eyes hurt).

Sunday was also my wedding anniversary (13 years!) and so I decided to make something romantic.

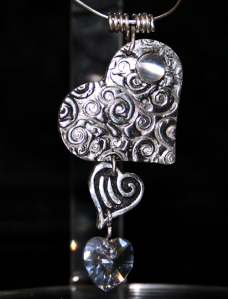
Deciding again not to solder or torch PMC (the fumes hurt my head); I trawled through my PMC fine silver pieces that had already been fired, to see what I had lurking about.  I found a pretty heart with an embossed texture and a slightly defective bezel, as well as a more modern and much smaller heart which I had started to gold-leaf but hadn’t got very far with it.  I wanted a third heart (it’s not often you get to say that!), but didn’t have a silver one that was just right, so a Swarovski® crystal 10mm heart in Moonlight Crystal seemed a good choice.

Today, I’ve been inspired with those “topsy-turvy” cakes with each layer at a different angle and looking like the whole thing is about to fall over.  For this look, the three hearts were first placed flat on my micro-fibre mat (very soft, so no scratching of silver or crystal, and nothing rolls about) so that they looked “topsy-turvy”; and then to make sure the holes were drilled in the right place, a straight piece of wire was laid down the centre of the design (a ruler, strip of paper or any other straight item to hand would have done, but I prefer wire as it’s light and doesn’t hide any of the design so you get a good idea of what it will look like) and then the right places were marked with a permanent marker.

Before drilling, indents were made by hammering a sharpened nail where I had marked – this would help the drill bit stay in the right place and not “chatter”, which is where it skips across the surface.  I find it essential as I mostly use a tiny pin vice and do the drilling by hand.

The largest heart had a plain-walled bezel which I had previously set a gem into but the gem was slightly too small and had to be removed as it didn’t fit the setting tight enough.  To make the bezel usable again, the walls were straightened from the inside using a metal burnisher to push the silver outwards; and then the base (which the gem would sit on) was drilled a bit deeper and smoothed out.

I have some beautiful cabochon moonstones and I found one which was the right diameter and which the bezel would fit round tightly.  This was then set with a pusher and burnisher.

The two PMC fine silver hearts were given a bit of a patina with black gilder’s wax.  I wanted the effect to be aged rather than uniform and, although the black didn’t come out on the photo as dark as it is in real life, I think it worked pretty well.  The highest points were re-polished to a mirror-shine, and a coating of Renaissance Wax was applied to seal and protect.

The silver hearts were connected with a jump-ring, and the crystal heart used a round head pin as a bail to attach it to the smaller silver heart.  The pin was threaded through the hole at the top of the heart, with the ball-end at the front.  The wire was gently (the crystal is more delicate than it looks, especially when using metal tools) curled around from the back and then bent so that the wire went straight upwards.  A loop was formed at the top and this was threaded through the lower hole in the smaller heart, so the crystal heart would hang nicely with some movement.

PMC fine silver hearts with swarovski crystal heart

I didn’t want a traditional bail for the necklace, so I formed a loop in a middle of some silver wire and threaded it through the top hole in the largest heart.  Then, taking a thin jump-ring former, the wire was coiled either side and the excess wire trimmed off from the back.

I think the unusual angles of the hearts give it interest and movement.  I may just have to go make a pair of earrings to match!

Oh, just to say, Day 29 will have to be written up with Day 30 – as it’s after midnight and now I’m going to see if I can go sleep this headache away.

“One-a-Day” Recycling Challenge – Day 27: Birthday Present

Wow, Day 27 already?  Where has the time gone?

Talking of time – apologies for the lateness of this post (it’s already half past midnight) but it’s been a busy day with both creating jewellery and going with my little girl to a birthday party at the local play-barn.

Today I wondered that when I talk or write about making things from scrap or recycled materials (even if they are precious metals), do those phrases bring to mind rubbish or even that the end product is sub-standard in some way?  It’s so hard to get beyond those concepts when recycling is part of the discussion; as if something that is reused or recycled has to be flawed in some way or that it’s previous life has to be hidden to value the new item in any way.

I suppose this came to mind more today because I was making a birthday present for a little girl and I wanted to include it in this challenge.  I didn’t need to – I could have made her something from new silver sheet or wire, but I really believe in not wasting precious resources and all my silver is the same (well, either pure or sterling, anyway), even if it has been made into something else before.

The elements that I wanted to re-use were some pure silver PMC3* pieces, which were either testers or were reclaimed from other jewellery I had previously made (and then taken apart again – artist’s prerogative).  Luckily, I had made a tester of the right initial for the little girl’s name and it was sitting, waiting, in my box of misc. fired PMC pieces.  Looking through the box, I also found some stars of different sizes and took two – one big and one small.

I really dislike the phrase “on-trend” – it’s overused everywhere these days.  Well, something that seems on-trend (*winces*) in jewellery at the moment is chain necklaces with a drop of chain at the front with charms hanging from it – very bohemian, but with a chic style that could go well with a little black dress or a smart work suit.  It also seemed a fun and light necklace for a little girl’s jewellery box – something special but not too grown up (children should be children, in my book) that she could grow into.

Checking my box of chains (wow, that doesn’t sound *quite* as it should!), by now you’ll have realised that I keep all my materials grouped by colour or type in compartmented boxes , I found a small section of good quality silver belcher chain and some jump-rings of different sizes (although I don’t know why they were in there, my putting away must have been off that day!).  Looking at all the pieces, a design was sketched out and then off to the bench to put it all together.

I added all the pieces together with the jump-rings, which were then soldered closed carefully so as not to solder the jump-ring to anything else except itself – easier said than done!  A pair of locking tweezers, holding the jump-ring about mid-way, were very helpful in acting as a heat sink and stopping the solder travelling past the join and onto anything else.  A larger jump-ring (in a wider gauge wire) was attached to the top of the chain to act as a bail, and was also soldered closed.

As chain is notoriously hard (and dangerous) to polish with a rotary motor – the chain went into the tumbler, alongside the head-pin which I would use for the last dangle off the chain.  This would work-harden the silver, making it more hard-wearing, as well as giving it a mirror-shine.

After tumbling, I added the last dangle – a single freshwater pearl.  I believe that the pearl is the oldest known gem and was originally seen as the most valuable.  The story I like best about pearls, is that they are formed by angels travelling through the clouds of heaven.  A perfect gem for a little girl, I think.

(Sorry for how the pearl looks in the photo – I don’t seem to be able to take a good photo of pearls – it’s another thing for me still to learn)

Oh, see how time flies when posting?  It’s now 1:20 am and I think I’d better show you the necklace now before I go and collapse after this tiring day.  Well, here it is – and don’t tell me that it doesn’t look perfectly beautiful, even more so because I re-used and recycled.


*Precious Metal Clay is pure silver, which has itself been recycled, in an organic clay binder which can be moulded or worked like clay but when fired at the right temperature, will turn back into pure silver with the binder burning away totally

“One-a-Day” Recycling Challenge – Day 26: A Girlfriend for Pete

Remember Pete, my little bat from Day 16?  Well, today he got a girlfriend.

I’m down to really tiny pieces of silver sheet and odd pieces of wire in my main scrap box – so I wasn’t going to be making something big today.  I had made myself a replacement engagement ring a little while ago (the original had worn too thin and was uncomfortable to wear) out of two circles of wire soldered together, with the front part opened up enough so that I could set a rainbow moonstone with a heart shape either side.  I wanted to try this technique out again and I thought that a little bat would look great in the frame of silver wire.

The silver wire I would be using is the Reflections silver wire, which would make life easier with less pickling because of resisting fire-scale.

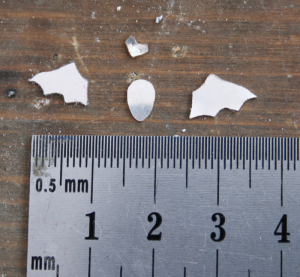
As you can see, the bat had to be cut in sections from lots of little pieces of scrap silver sheet.  It was quite difficult to use a hand saw with such small pieces but, apart from one broken saw blade, everything turned out how I wanted it.  Then, I soldered it all together with hard solder, making sure that all the seams were tight.

To make the ring, I decided to take two lengths of round 0.8mm silver wire and shape the middle of each to be a half-oval.  Putting the two wires together as a mirror-image of each other, both ends (where the wires lay parallel to each other) were soldered to make the ring shank.

When the bat was placed in the oval, even though it looked fine, I decided to shape the wire around the bat rather than leave it the oval shape.  This was easier said than done because the wires had already been soldered together and that left me with only so much wire that would still move.  Oh well, hindsight is always 20:20, yes?

Once the “oval” was roughly the right bat-shape, the little bat was soldered in place with hard solder.  Any previous solder joints that melted would re-harden again without moving due to the fact that all the pieces were still flat.  If this had been shaped or already formed into a ring, this technique would not have worked and a lower temperature solder would have been used to avoid melting the original joins.

The ring was then formed on a metal ring mandrel (looks like a thin cone which is marked out in graded ring sizes) with a raw-hide hammer, so as not to mark or distort the silver.  The ring shank cut to size and the joint soldered with medium solder (after having been taken off the mandrel!).  I took this opportunity to check the back of the ring and solder again any part that had not been done to my satisfaction.

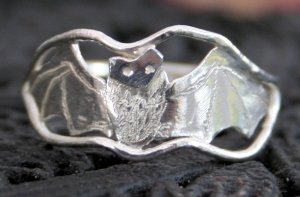
The ring was put back on the mandrel to check that it was still round and to make sure the ring shank was level (heating the ring for soldering can distort the piece so it is always best to re-check your work afterwards).  Looking at the little bat, it occurred to me that she was missing any definition (except for her eyes, which were round indents punched with a sharpened nail and a hammer).  Leaving the ring on the mandrel for support, the lines on her wings where her bones would be and the fur-like texture on the main body were created with a motorised engraver.  I don’t use the engraver much as it buzzes extremely loudly – even a few minutes of using it is enough for me!

Another check and then into the tumbler for about an hour.  It comes out looking really shiny, but after taking photos, I decide that it could do with a final polish by hand to make sure any fine scratches (which show up on the photos but you can’t see by the naked eye) are removed.  I am in two minds about adding black (by either Liver of Sulphur or by Gilder’s wax) into the details; on one hand – the patina may not stay in the engraved lines and just polish off, but on the other hand – it may make it easier to see the details and this little bat is really pretty.  If I decide to add the black, I will do an update post with new photos.

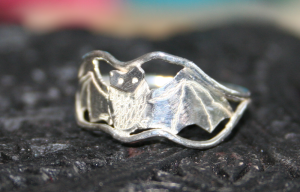
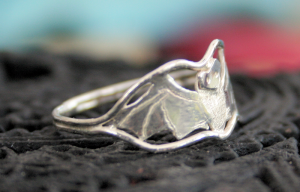
Anyway, here is the little ring (it’s size is about halfway between “O” and “P” on the ring mandrel):